React native is a tool that allows developers to write apps one and render them anywhere: Android, iOS, web, and more. One does not need a state of the art PC or a mac in order to start learning how to develop things with React Native. While tools such as expo allow for one to test on any smartphone, one does not need to use that and can develop and test on the same PC. Learn how to set up a developer environment for React Native on a PC using Windows Subsystem for Linux (aka WSL). As a bonus, WSL subsystem for Linux is also a fantastic developer environment for more traditional web development work too!
Why?
I use a Mac at work and a PC for most of my personal work. There are positives and negatives about each, however PCs are bby more accessible to most. Meaning, folks are far more likely to be own and/or be able to afford a PC. Globally, this is also the case with android devices. Macs do enable one to develop and test iPhone apps, while PCs do not. Meaning to create an iPhone app, one will need a Mac. One does not need a fancy Mac computer to start coding apps! Start like a pro in a unix like environment! Learn and do great things with what you have!
Setting Up WSL
First, one needs to set up Windows Subsystem for Linux, aka WSL. To do this, one should follow Microsoft's own instructions. You can skip this section if you already have WSL installed. A tl;dr summary is the following:
- Make sure windows 10 version 2004, build 19041 or higher are running. To check
this, press
Windows Key + ron the keyboard, type inwinverand select ok. The version and build number will be displayed. - Check if virtualization support is enabled by clicking start, typing in "task manager," navigate to performance, click CPU and on the bottom there should be something that says "Virtualization: Enabled." If this is not the case, follow these linked instructions to enable virtualization for one's machine based on its manufacturer.
- Open powershell as administrator (right click, run as administrator) and type
dism.exe /online /enable-feature /featurename:VirtualMachinePlatform /all /norestartto enable Virtual Machine Platform in windows. - While still in powershell as administrator type
dism.exe /online /enable-feature /featurename:Microsoft-Windows-Subsystem-Linux /all /norestart - Reboot the machine.
- Open powershell as administrator and type
wsl --set-default-version 2. - If there's a message stating a kernel update is needed, follow these linked instructions.
- Go to the windows store and download Ubuntu with this link.
Once installed, connect to it by opening a shell
(I suggest getting/using Window Terminal)
and just typing in ubuntu. There will be some prompts to set up an account.
Setting up Node and NPM
The following sequence of commands will install node and npm. You can skip this
if node -v and npm -v ouputs something. However, it may still be worth
running to update to the latest version of each.
$ sudo apt update
$ sudo apt install nodejs
$ node -v
$ sudo apt install npm
$ npm -v
This is all that is needed to start doing traditional web development in a WSL environment.
Setting Up Android in Windows
The "host" windows installation is going to be what runs the emulated android device as well as an instance of adp (android debugger). Download and install Android Studio.
To make a virtual device, do the following after creating a new project and following the prompts:
-
Then hit the AVD manager button. Phone with the Android alien head peeking.

-
Click "Create Virtual Device"
-
Select a device. I suggest a Pixel 2. Hit next.
-
Hit download next to the release name "Q." Follow prompts to download. Once highlighted, hit next.
-
Hit finish.
Now one needs to set up adb:
- On the android studio page, download the "SDK tools package" for windows.
- Once downloaded, extract the zip to
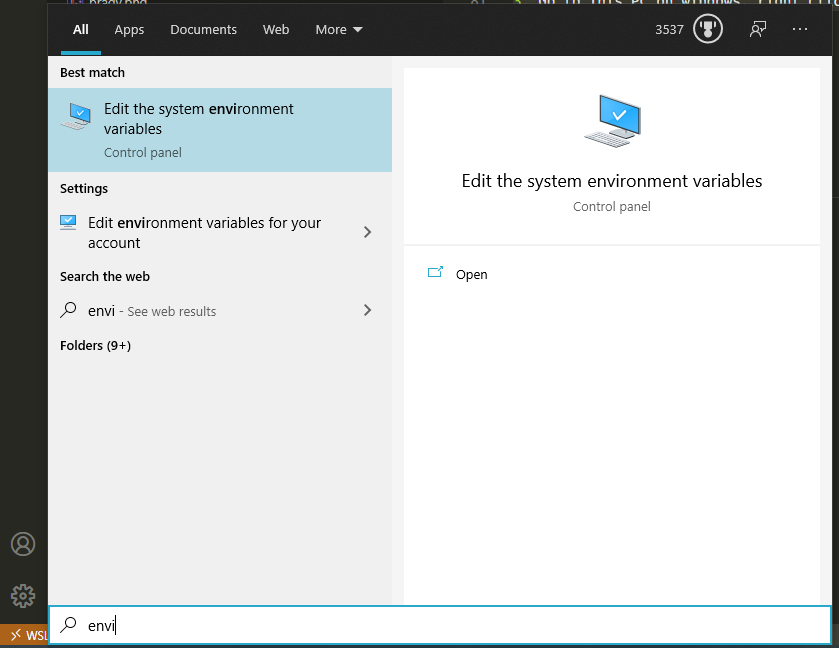
C:\platform-tools - Bring up the menu to edit system environment variables, see below:
- Hit "Environmental Variables"
- Under "System Variables" select
PATHand hit "edit" - Hit new and add
C:\platform-toolsto the list. - Hit Ok, Ok, and a final Ok. to close all of the dialog windows.
The adb command now should be able to be run from new terminal instance in the
host windows env.
Setting Up On Linux
Making a react native app is pretty standard. Run the following from the user
home directory. To get there type cd ~. To create a new react native project
run npx react-native init ProjectName optionally substituting ProjectName with
a different name.
Next, run the following sequence of commands. One should just copy them and run.
cd ~
sudo apt-get install unzip
wget https://dl.google.com/android/repository/sdk-tools-linux-4333796.zip
unzip sdk-tools-linux-4333796.zip -d Android
rm sdk-tools-linux-4333796.zip
sudo apt-get install -y lib32z1 openjdk-8-jdk
export JAVA_HOME=/usr/lib/jvm/java-8-openjdk-amd64
export PATH=$PATH:$JAVA_HOME/bin
printf "\n\nexport JAVA_HOME=/usr/lib/jvm/java-8-openjdk-amd64\nexport PATH=\$PATH:\$JAVA_HOME/bin" >> ~/.bashrc
cd Android/tools/bin
./sdkmanager "platform-tools" "platforms;android-26" "build-tools;26.0.3"
export ANDROID_HOME=/home/$USER/Android
export PATH=$PATH:$ANDROID_HOME/tools
export PATH=$PATH:$ANDROID_HOME/platform-tools
printf "\n\n\nexport ANDROID_HOME=/home/$USER/Android\nexport PATH=\$PATH:\$ANDROID_HOME/tools\nexport PATH=\$PATH:\$ANDROID_HOME/platform-tools" >> ~/.bashrc
android update sdk --no-ui
printf "\n\nexport export WSL_HOST=$(tail -1 /etc/resolv.conf | cut -d' ' -f2)\nexport export ADB_SERVER_SOCKET=tcp:\$WSL_HOST:5037" >> ~/.bashrc
sudo apt-get install gradle
gradle -v
The output of the final command should be the version of gradle being used.
Bringing It All Together
The app now has everything needed to run.
In Windows,
-
Go to Android Studio's AVD manager and press the green play button.
-
In a terminal run as administrator:
-
adb kill-server -
adb -a nodaemon server start -
One should see something similar to the following in the output of
adb devicesPS C:\Users\Ryan> adb devices List of devices attached emulator-5554 device
-
In the ProjectName directory:
- In one terminal window, run the following:
npx react-native start --host 127.0.0.1 - In a second terminal: run the following:
npx react-native run-android --variant=debug --deviceId emulator-5554whereemulator-5554matches the output of the device command.
One may save those in their package json as the following:
    {
      ...
      "scripts": {
        "wsl-server": "npx react-native start --host 127.0.0.1",
        "wsl-android": "npx react-native run-android --variant=debug --deviceId emulator-5554",
        ...
      }
      ...
    }
React native should be running on the android device in windows! Happy hacking!
Troubleshooting
-
Restart the computer.
-
Restart the emulator with a cold boot. To do this close the emulator and go to restart it, but instead of clicking the play button, hit the down caret to the right and run a cold boot.
-
Make sure USB debugging is enabled on android. To do this go to settings in the emulator, hit the build number until it says developer options are enabled, then go to developer options and enable usb debugging.
-
Check the path variables. Anything that says
exportin linux is a variables. Runecho $variableto see it's result. For exampleecho $WSL_HOSToutputs172.28.48.1. -
One's milage may vary, but these instructions also worked with creating an expo app. In addition, the following needed to be run prior to installing the expo cli.
sudo chown -R $USER /usr/local/bin/ sudo chown -R $USER /usr/local/lib/ -
Questions? Tweet me @rjerue!